【文章內容使用 Gemini 1.5 Pro 自動翻譯產生】
使用 AngularDart 整合 Google 地圖
本文將介紹如何將 Google 地圖整合到 AngularDart 應用程式中。該應用程式本身非常簡單:它計算地圖上兩個選定標記之間的大圓距離(球體表面上的最短距離)。
在此過程中,您將:
- 註冊您自己的 Google 地圖 API 金鑰。
- 建立一個基本的 Angular 網頁應用程式。
- 將 Dart 與 Google 地圖 JavaScript API 整合,並處理地圖互動。
- 學習一些 Angular 元件的優化技巧。
本文的篇幅大約是程式碼的四倍。如果您願意,可以直接查看完整的原始碼和最終的Demo。
 Demo 的螢幕截圖
Google 地圖 JavaScript API
Google 地圖 JavaScript API允許開發人員在其網站上嵌入和整合 Google 地圖。您可以使用自己的圖像、數據和處理來自訂顯示的地圖內容和處理方式。
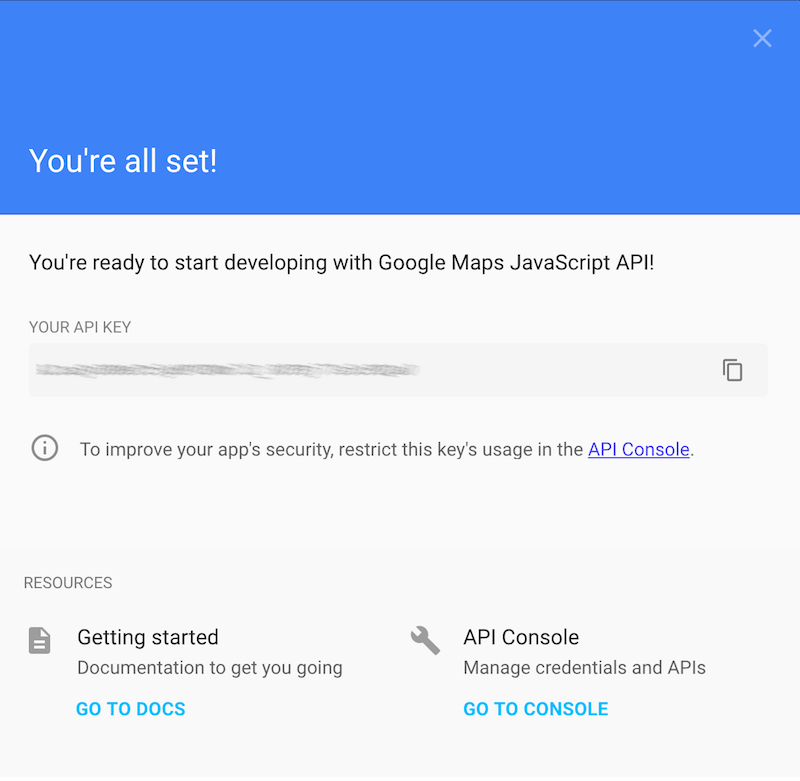
要開始使用 Google 地圖 API 進行開發,您必須註冊一個免費的 API 金鑰,該金鑰允許合理的使用量。隨著您的應用程式獲得更多關注,您可以將其升級到付費方案。
訪問JavaScript API 頁面,然後在頁面頂部點擊「取得金鑰」。為您的專案建立名稱,然後點擊「建立並啟用 API」:

您的金鑰將在幾秒鐘內啟用並準備使用:
記下您的 API 金鑰。我們將在擷取地圖 JavaScript 函式庫時使用它:
1
| https://maps.googleapis.com/maps/api/js?key=您的金鑰
|
在 JavaScript 中,要建立地圖實例並在其上放置標記,我們將使用以下程式碼:
1
2
3
4
5
6
7
8
9
10
| var hostElement = document.getElementById('map-id');
var map = new google.maps.Map(hostElement, {
zoom: 2,
center: {lat: 47.4979, lng: 19.0402}
});
var marker = new google.maps.Marker({
position: {lat: 47.4979, lng: 19.0402},
map: map,
label: 'A'
});
|
稍後您將看到,Dart 程式碼將非常相似(具有 Dart 的所有額外好處)。
AngularDart 應用程式
開始使用 AngularDart 應用程式的最簡單方法是遵循入門指南,並在 WebStorm 或 IntelliJ IDEA 的社群版中建立新專案。
如果您使用的是不同的編輯器,或者您只想遵循我們的範例程式碼的結構,以下是最低要求。
在 pubspec 檔案 pubspec.yaml 中:
1
2
3
4
5
6
7
8
9
10
11
12
13
14
15
16
17
18
19
20
21
22
| name: google_maps_angular_dart
version: 0.0.1
description: 整合 Google 地圖的 Angular 應用程式
environment:
sdk: '>=1.19.0 <2.0.0'
dependencies:
angular2: ^2.2.0
google_maps: ^3.0.0
dev_dependencies:
dart_to_js_script_rewriter: ^1.0.1
transformers:
- angular2:
platform_directives:
- 'package:angular2/common.dart#COMMON_DIRECTIVES'
platform_pipes:
- 'package:angular2/common.dart#COMMON_PIPES'
entry_points: web/main.dart
- dart_to_js_script_rewriter
|
在主機頁面 web/index.html 中:
1
2
3
4
5
6
7
8
9
10
11
| <!DOCTYPE html>
<html>
<head>
<script src="https://maps.googleapis.com/maps/api/js?key=您的金鑰"></script>
<script defer src="main.dart" type="application/dart"></script>
</head>
<body>
<map-control></map-control>
</body>
</html>
|
在應用程式的入口點 web/main.dart 中:
1
2
3
4
5
6
| import 'package:angular2/platform/browser.dart';
import 'package:google_maps_angular_dart/component/map_control.dart';
void main() {
bootstrap(MapControl);
}
|
在 <map-control> 元件的 Dart 檔案 lib/component/map_control.dart 中:
1
2
3
4
5
6
7
8
9
| import 'package:angular2/core.dart';
@Component(
selector: 'map-control',
template: '{{distance}}',
)
class MapControl {
String distance = '尚未計算距離';
}
|
上面的程式碼不會做太多事情,但這是一個開始,您可以使用 pub serve 執行它,然後在 Dartium 中打開頁面:
1
2
3
4
5
| $ pub serve
Loading source assets...
Loading angular2 and dart_to_js_script_rewriter transformers...
Serving google_maps_angular_dart web on http://localhost:8080
Build completed successfully
|
Google 地圖整合
要開始 Google 地圖整合,請將以下 script 標籤放入您的 web/index.html 中。請注意,您需要設定您的 API 金鑰:
1
| <script src="https://maps.googleapis.com/maps/api/js?key=[您的金鑰]"></script>
|
幸運的是,pub 上有一個現成的 Google 地圖 Dart 套件。將其加入到您的 pubspec.yaml 中:
1
2
3
| dependencies:
angular2: ^2.2.0
google_maps: ^3.0.0
|
然後執行 pub get以下載套件。
我們需要在元件模板中為地圖區域建立一個主機元素。我們將從基本樣式開始,並使用 #mapArea 錨點在下一步中識別元素:
1
| <div style="width: 300px; height: 300px" #mapArea>[map]</div>
|
在元件程式碼中,我們可以注入元素的參考,如下所示:
1
2
| @ViewChild('mapArea')
ElementRef mapAreaRef;
|
在 MapControl 類別建立後,元素參考不會立即提供,因此我們需要連接到 Angular 的生命週期回調:
1
2
3
4
5
6
7
| class MapControl implements AfterViewInit {
@override
void ngAfterViewInit() {
}
}
|
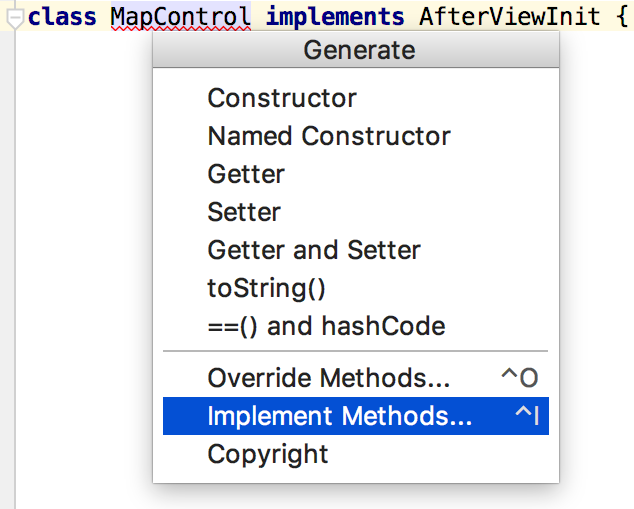
提示:使用 IDE 為您撰寫方法主體。例如,在 IntelliJ 中,按 CMD + N(或 CTRL + N),然後選擇「實作方法…」選單項。它將允許您選擇缺少的方法,您只需要擔心方法主體:
如下面的程式碼所示,Dart API 與 JavaScript API 非常相似,額外的好處是它經過類型檢查。
1
2
3
4
5
6
7
8
9
10
11
12
13
14
15
16
17
18
| class MapControl implements AfterViewInit {
@override
void ngAfterViewInit() {
GMap map = new GMap(
mapAreaRef.nativeElement,
new MapOptions()
..zoom = 2
..center = new LatLng(47.4979, 19.0402)
);
new Marker(new MarkerOptions()
..map = map
..position = new LatLng(47.4979, 19.0402)
..label = 'A');
}
}
|
類型檢查好處的一個例子是,當我們監聽事件時,我們不需要考慮如何存取屬性。例如,IDE 可以幫助我們找到包含標記位置的 MouseEvent 屬性 (latLng)。
以下程式碼回應拖動標記:
1
2
3
| marker.onDrag.listen((MouseEvent event) {
print('拖動時的新位置:${event.latLng}');
});
|
在地圖上擷取點擊事件類似:
1
2
3
| map.onClick.listen((MouseEvent event) {
print('使用者點擊的位置:${event.latLng}');
});
|
整合在一起
為了測量兩個坐標之間的距離,我們將在地圖上追蹤兩個標記。使用者應該能夠拖動標記或透過點擊放置它們。
我們需要將地圖和標記作為欄位進行追蹤:
1
2
3
| GMap _map;
Marker _aMarker;
Marker _bMarker;
|
更新初始化以儲存地圖參考並註冊點擊處理程式。點擊處理程式會更新標記位置和距離:
1
2
3
4
5
6
7
8
9
10
11
12
13
14
| @override
void ngAfterViewInit() {
_map = new GMap(
mapAreaRef.nativeElement,
new MapOptions()
..zoom = 2
..center = new LatLng(47.4979, 19.0402)
);
_map.onClick.listen((MouseEvent event) {
_updatePosition(event.latLng);
_updateDistance();
});
}
|
這是點擊處理程式第一部分的程式碼:
1
2
3
4
5
6
7
8
9
10
| void _updatePosition(LatLng position) {
if (_aMarker == null) {
_aMarker = _createMarker(_map, 'A', position);
} else if (_bMarker == null) {
_bMarker = _createMarker(_map, 'B', position);
} else {
_aMarker.position = _bMarker.position;
_bMarker.position = position;
}
}
|
標記實例化的程式碼與前面的範例類似:
1
2
3
4
5
6
7
8
9
10
11
| Marker _createMarker(GMap map, String label, LatLng position) {
final Marker marker = new Marker(new MarkerOptions()
..map = map
..draggable = true
..label = label
..position = position);
marker.onDrag.listen((MouseEvent event) {
_updateDistance();
});
return marker;
}
|
借助 dart:math 中的工具函數,我們能夠處理大圓距離計算的數學運算,並在我們的 distance 欄位中設定值:
1
2
3
4
5
6
7
8
9
10
11
12
13
14
15
16
17
18
19
|
const int radiusOfEarth = 6371;
double _toRadian(num degree) => degree * PI / 180.0;
void _updateDistance() {
if (_aMarker == null || _bMarker == null) return;
LatLng a = _aMarker.position;
LatLng b = _bMarker.position;
double dLat = _toRadian(b.lat - a.lat);
double sLat = pow(sin(dLat / 2), 2);
double dLng = _toRadian(b.lng - a.lng);
double sLng = pow(sin(dLng / 2), 2);
double cosALat = cos(_toRadian(a.lat));
double cosBLat = cos(_toRadian(b.lat));
double x = sLat + cosALat * cosBLat * sLng;
double d = 2 * atan2(sqrt(x), sqrt(1 - x)) * radiusOfEarth;
distance = '${d.round()} 公里';
}
|
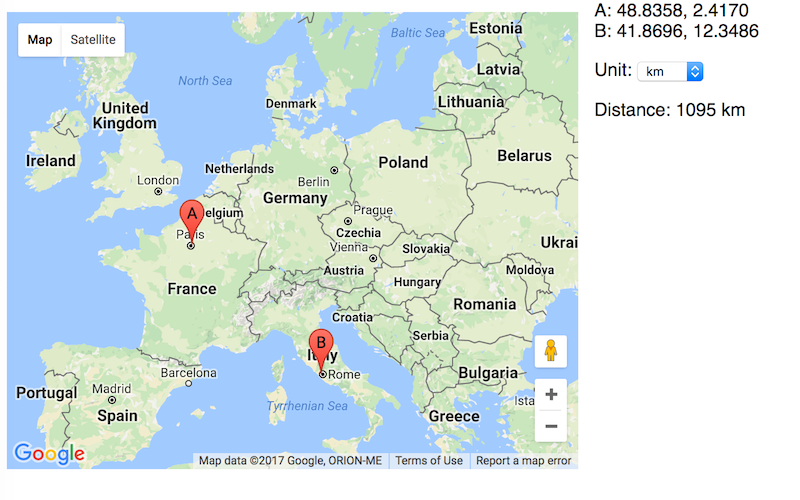
您是否曾經想過您住的地方距離親戚、著名地點或地標有多遠?現在是時候試用該應用程式並親自檢查一下了。事實證明,我家距離山景城的 Google 總部 9815 公里:
 加州山景城 Googleplex 與作者在匈牙利布達佩斯的住所之間的距離
優化應用程式
此時,我們 Angular 應用程式中的 Google 地圖整合已完成。我們正在監聽和回應地圖事件,並在地圖上建立物件。在最後一部分中,我們將實作一些功能,為我們的 Demo 增添一些美好的修飾。
分離模板和樣式
將複雜的 UI 模板放在單獨的 .html 檔案中是一個好習慣。我們可以用 CSS 樣式做同樣的事情:
1
2
3
4
5
| @Component(
selector: 'map-control',
templateUrl: 'map_control.html',
styleUrls: const <String>['map_control.css'])
class MapControl implements AfterViewInit {
|
地圖元素有一個 CSS 類別 map-area:
1
| <div class="map-area" #mapArea>[map]</div>
|
我們的 CSS 檔案可以像這樣簡單:
1
2
3
4
5
| .map-area {
width: 500px;
height: 400px;
margin: 10px;
}
|
處理距離單位
有些人精通公里 ↔ 英里的轉換,但我們其他人想要一個下拉選單,我們可以在其中選擇距離單位。在 HTML 模板中,下拉選單可以是一個簡單的 <SELECT> 元素,模型綁定到 unit 欄位。
1
2
3
4
5
| <label>單位:</label>
<select [(ngModel)]="unit">
<option value="km">公里</option>
<option value="miles">英里</option>
</select>
|
在 Dart 程式碼中,我們想要儲存單位,並在單位更新時更新距離:
1
2
3
4
5
6
7
8
| String _unit = 'km';
String get unit => _unit;
set unit(String value) {
_unit = value;
_updateDistance();
}
|
並且別忘了在距離計算中更新先前硬編碼的公里:
1
2
3
4
5
6
7
8
|
const double milesPerKm = 0.621371;
if (unit == 'miles') {
d *= milesPerKm;
}
distance = '${d.round()} $unit';
|
格式化坐標
如果我們想發佈標記的位置怎麼辦?最簡單的方法是在 Dart 中公開位置值,這樣我們就可以在模板中使用 {{a}} 和 {{b}}:
1
2
3
|
LatLng get a => _aMarker?.position;
LatLng get b => _bMarker?.position;
|
當標記尚未初始化時,模板可以隱藏標籤,防止潛在的空值問題:
1
2
| <div *ngIf="a != null">A: {{a}}</div>
<div *ngIf="b != null">B: {{b}}</div>
|
但是,{{a}} 將會轉換為調用 LatLng.toString(),它會給我們兩個非常長的 double 值,而幾個數字就足夠了。一種解決方案是在模板中使用管道:
1
2
3
| <div *ngIf="a != null">A: {{a.lat | number : '1.4-4'}}, {{a.lng | number : '1.4-4'}}</div>
<div *ngIf="b != null">B: {{b.lat | number : '1.4-4'}}, {{b.lng | number : '1.4-4'}}</div>
|
模板語法指南建議將該邏輯放在控制器類別中,以便更好地進行測試:
1
2
3
4
5
6
7
8
9
10
11
|
String get aPosition => _formatPosition(a);
String get bPosition => _formatPosition(b);
String _formatPosition(LatLng pos) {
if (pos == null) return null;
return '${pos.lat.toStringAsFixed(4)}, '
'${pos.lng.toStringAsFixed(4)}';
}
|
這樣,模板就可以更簡單了:
1
2
| <div *ngIf="a != null">A: {{aPosition}}</div>
<div *ngIf="b != null">B: {{bPosition}}</div>
|
清理模板
最後一步,將所有剩餘的程式碼部分從模板移動到控制器:
1
2
3
4
5
6
7
8
|
bool get showA => a != null;
bool get showB => b != null;
bool get showDistance => distance != null;
|
這樣做,模板只會參考 getter:
1
2
3
4
5
6
| <div *ngIf="showA">A: {{aPosition}}</div>
<div *ngIf="showB">B: {{bPosition}}</div>
<p *ngIf="showDistance">
距離:{{distance}}
</p>
|
結語
如您所見,使用 Google 地圖實作雙向整合很容易:原始碼乾淨且易讀。在 Dart 工具鏈的全力支援下,它很容易擴展,而無需擔心我們可能會在其他地方造成破壞。
讀者可以練習一下,使用 Dart 中的相同 API 將熱圖視覺化新增到地圖中。查看 google_maps 套件以了解所有可能性。

使用 AngularDart 的 Google 地圖 最初發佈在 Medium 的 dartlang 上,人們在那裡透過突出顯示和回應這個故事來繼續討論。